../整理Git命令 👍

- 安装、配置
- 创建版本库 init
- 关联远程版本库 remote
- 暂存、提交 add、commit
- 克隆 clone
- # 日志 log、reflog
- 分支(节点)创建/切换/回退 branch、checkout、reset
- 暂存修改 stash
- 合并 merge
- 对比 diff
- 忽略特殊文件 .gitignore
- 子模块 submodule
- 未归类
整理:按功能归类常用命令行

安装、配置
sudo apt-get install git
配置:ssh
配置本地信息
git config --global user.name "xxxxxxxxxxx"
git config --global user.email "xxxxxx@xxxxx.com"
git config --list
# 如果没有 global 可以在 .git/config 中查看
配置ssh密钥
ssh-keygen -t rsa -C xxxxxxxxxxxxx@xxxxx.com
cat ~/.ssh/id_rsa.pub
粘贴到 https://github.com/settings/keys
测试
ssh -vT git@github.com
配置:代理连接
下面几种方法
# Method 1. git http + proxy http
git config --global http.proxy "http://127.0.0.1:1080"
git config --global https.proxy "http://127.0.0.1:1080"

# Method 2. git http + proxy shocks
git config --global http.proxy "socks5://127.0.0.1:1080"
git config --global https.proxy "socks5://127.0.0.1:1080"

# to unset
git config --global --unset http.proxy
git config --global --unset https.proxy

# Method 3. git ssh + proxy http
vim ~/.ssh/config
Host github.com
HostName github.com
User git
ProxyCommand socat - PROXY:127.0.0.1:%h:%p,proxyport=1087

# Method 4. git ssh + proxy socks
vim ~/.ssh/config
Host github.com
HostName github.com
User git
ProxyCommand nc -v -x 127.0.0.1:1080 %h %p
创建版本库 init
# 初始化
git init

# 添加修改的文件
git add README.md

# 提交版本
git commit -m "add 3 files."
关联远程版本库 remote
创建远程仓库
上传本地内容
# 关联origin(默认的名字)到远程库
git remote add origin git@github.com:cuihanObject/cmdTest.git
git remote -v

# 推送版本
git push --set-upstream origin master
# 以后推送就只需要
git push
# 默认会补全缺省
git push origin master
==注意:这里需要配置好ssh密钥==
暂存、提交 add、commit
git add .

git commit -m "xxxxxxxxx"

git commit --amend (修改上次提交) --no-edit(不修改评论)
概念:作区(working directory)和版本库(repository)、暂存区(stage)
- 工作区(Working Directory) 就是系统目录
- 版本库(Repository) 工作区有一个隐藏目录
.git,它就是版本库 - 暂存区(stage)
.git里存了很多东西,其中最重要的就是称为stage(或者叫index)的暂存区
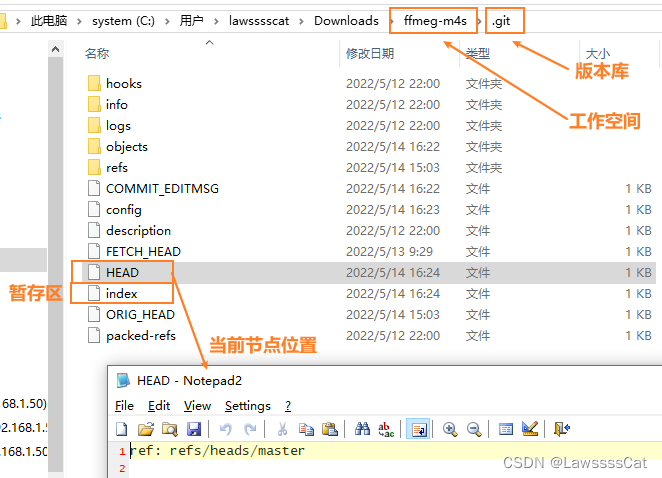
add 和 commit 的操作如下
-
git add实际上就是把文件修改添加到暂存区 -
git commit提实际上就是把暂存区的所有内容提交到当前分支

概念:文件状态周期
 (工作区 - 缓存区 - 提交区 )
克隆 clone
–depth 1
git clone --depth 1 https://github.com/labuladong/fucking-algorithm.git
可以看到我们只克隆下包含最近一次commit的一个分支,这样这个项目文件就不会很大
# 日志 log、reflog
# 查看HEAD全部的变化
git reflog
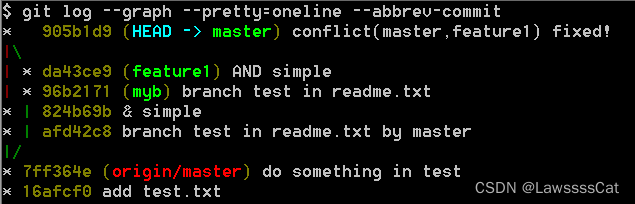
# –graph 图形
# –pretty=oneline 减少数据
# –abbrev-commit 头部数据减少
git log --graph --pretty=oneline --abbrev-commit
分支(节点)创建/切换/回退 branch、checkout、reset
创建
# 创建
git branch dev
# 创建并切换新分支
git checkout -b dev
切换:工作空间切换
git checkout [版本] [文件]
回退:工作空间切换、==分支指向同时切换==
git reset --hard commit_id(可用 git log –oneline 查看)
《Git Reset 三种模式》 https://www.jianshu.com/p/c2ec5f06cf1a
删除
git branch -d dev
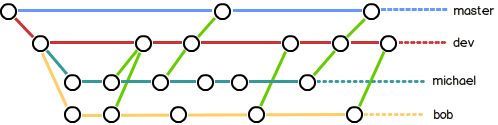
概念:分支管理策略
应用:github 回退 master 分支
# 切换master分支
git checkout master
# 回退本地
git reset --hard 1f12413691b70d2d75d3c982823f2018ef193e33
# 强制提交远程
git push origin master -f
暂存修改 stash
暂存
# 执行存储时,添加备注,方便查找
# 只有git stash 也要可以的,但查找时不方便识别。
git stash save “save message”
查看
# 查看stash了哪些存储
git stash list
# 显示做了哪些改动
# 默认show第一个存储,如果要显示其他存贮,后面加stash@{$num},比如第二个 git stash show stash@{1}
git stash show
恢复
# 应用某个存储,但不会把存储从存储列表中删除
# 默认使用第一个存储,即stash@{0},如果要使用其他个,git stash apply stash@{$num} , 比如第二个:git stash apply stash@{1}
git stash apply
# 应用某个存储,且会把存储从存储列表中删除
# 默认为第一个stash,即stash@{0},如果要应用并删除其他stash,命令:git stash pop stash@{$num} ,比如应用并删除第二个:git stash pop stash@{1}
git stash pop
删除
# 丢弃stash@{num}存储,从列表中删除这个存储
git stash drop stash@{num}
# 删除所有缓存的stash
git stash clear
问题:pop时发生冲突
==前提:pop时前应该把工作空间恢复到stash前的分支==
若分支经过提交,则可能发生冲突。pop时发生冲突后
- 手动恢复冲突
git stash drop stash@{num}
合并 merge
《git merge和git merge –no-ff的区别》 https://www.cnblogs.com/damoblog/p/13144379.html
# Fast forward 模式(默认)
git merge dev
git merge dev --ff

# no-ff 模式(推荐)
git merge --no-ff -m "merge with no-ff" dev
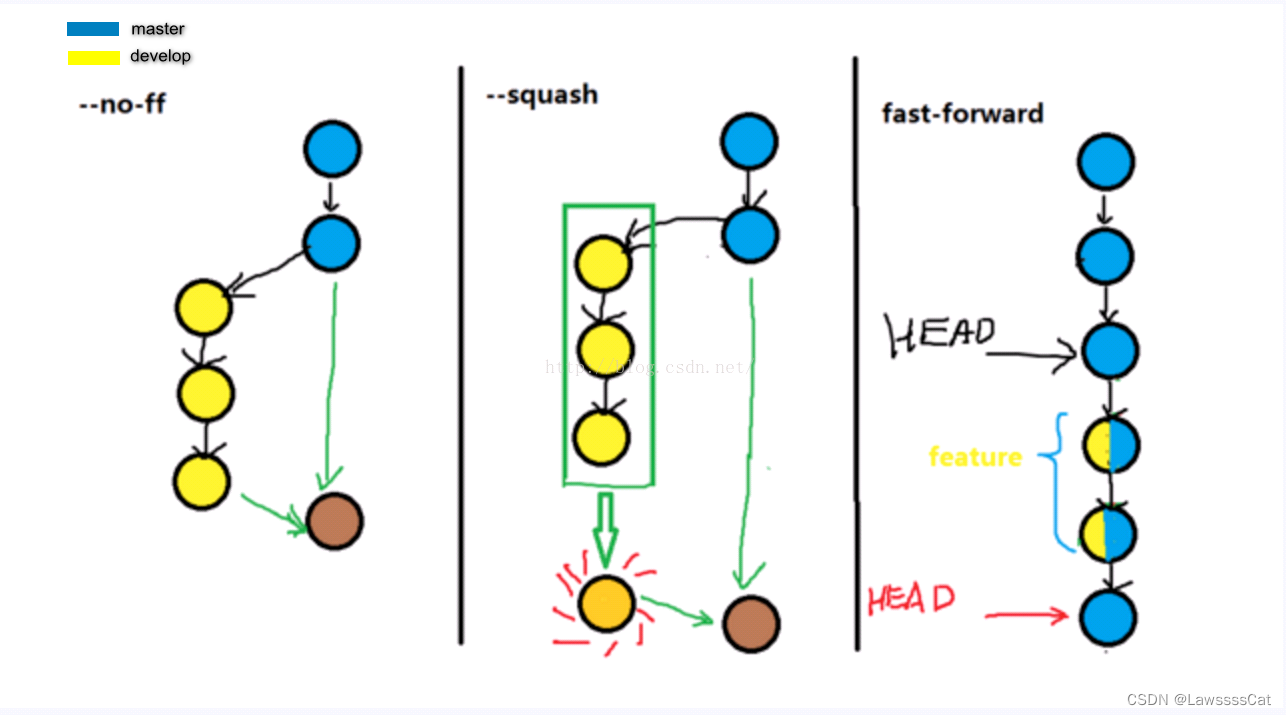
区分几种模式
- fast-forward Git 合并两个分支时,如果顺着一个分支走下去可以到达另一个分支的话,那么 Git 在合并两者时,只会简单地把指针右移,叫做“快进”(fast-forward)不过这种情况如果删除分支,则会丢失merge分支信息。
-
–squash 把一些不必要commit进行压缩,比如说,你的feature在开发的时候写的commit很乱,那么我们合并的时候不希望把这些历史commit带过来,于是使用–squash进行合并,此时文件已经同合并后一样了,但不移动HEAD,不提交。需要进行一次额外的commit来“总结”一下,然后完成最终的合并。
-
–no-ff(推荐) 关闭fast-forward模式,在提交的时候,会创建一个merge的commit信息,然后合并的和master分支merge的不同行为,向后看,其实最终都会将代码合并到master分支,而区别仅仅只是==master分支上简洁清晰==的问题;然后向前看,也就是我们使用reset的时候,就会发现,不同的行为就带来了不同的影响
如果发生冲突,使用status查看冲突位置,冲突修复后add进入暂存区消除冲突
git status
git add xxx
应用:远端fork合并(拉取fork项目代码)
Step 1: From your project repository, check out a new branch and test the changes.
git checkout -b esirplayground-master
git pull https://github.com/esirplayground/AutoBuild-OpenWrt.git master
Step 2: Merge the changes and update on GitHub.
git checkout master
git merge --no-ff esirplayground-master
git push origin master
合并前排除某些修改
- git merge –no-commit
- edit/revert the file to what you want it to be
- git add src/main/resources/application.properties
- git commit
对比 diff

git diff --cached(工作区-缓存区)
git diff HEAD  (工作区 - 缓存区 - 提交区 )
忽略特殊文件 .gitignore
注释 #
#忽略所有.svn目录
.svn/
#忽略所有target目录
target/
#忽略所有.idea目录
.idea/
#忽略所有.iml文件
*.iml
语法 | 含义 :– | :– / | 目录 * | 多个字符 ? | 单个字符 [] | 多个可选字符匹配单个字符 ! |不忽略(跟踪)匹配到的文件或目录
对于是否把文件进行版本管理,还有下面命令参数
-
添加版本管理 add -f
有些时候,你想添加一个文件到Git,但发现添加不了,原因是这个文件被.gitignore忽略了:
如果你确实想添加该文件,可以用-f强制添加到Git:
-
检察版本管理 check-ignore
或者你发现,可能是.gitignore写得有问题,需要找出来到底哪个规则写错了,可以用git check-ignore命令检查:
Git会告诉我们,.gitignore的第3行规则忽略了该文件,于是我们就可以知道应该修订哪个规则。
-
删除版本管理 rm
https://blog.csdn.net/sarafina527/article/details/104555842
.gitignore只能忽略那些原来没有被track(之前没有add过)的文件,如果某些文件已经被纳入了版本管理中,则修改.gitignore是无效的。
  git rm -r --cached target
  git rm -r --cached .idea
此后不再追踪track这两个文件夹
子模块 submodule
子模块添加
git submodule add ~/submd/repos/lib1.git
子模块查看
git submodule
子模块更新
git submodule update
git submodule foreach git pull
git submodule foreach --recursive git submodule init
git submodule foreach --recursive git submodule updat
注意:
git submodule add命令新增.gitmodules文件
(记录了子模块的:名称、本地路径 path、网络路径 url)$ cat .gitmodules [submodule "libs/lib1"] path = libs/lib1 url = /home/henryyan/submd/repos/lib1.git同时,
.git/config文件的内容,最下面有submodule的注册信息!$ git config --list --local ... submodule.libs/lib1.active=true submodule.libs/lib1.url=/home/henryyan/submd/repos/lib1.git如果是子模块不是通过
add添加,而是新拉的代码里面就有.gitmodules。这时候.git/config里是没有submodule的注册信息的,这时候需要initgit submodule init同时需要
update把子模块下载下来git submodule update
拉仓库同时把子模块拉下来
git clone --recursive /path/to/repos/foo.git
子模块移除
# 逆初始化模块,其中{MOD_NAME}为模块目录,执行后可发现模块目录被清空
git submodule deinit {MOD_NAME}
# 删除.gitmodules中记录的模块信息(--cached选项清除.git/modules中的缓存)
git rm --cached {MOD_NAME}
# 提交更改到代码库,可观察到'.gitmodules'内容发生变更
git commit -am "Remove a submodule."
此外,你可能还需要删除
.git/modules/{MOD_NAME}的缓存,否则无法创建同名的module.
子模块修改
- 修改
.gitmodules文件中对应模块的url属性 - 使用
git submodule sync命令,将新的URL更新到文件.git/config
(运行后可观察到.git/config中对应模块的url属性被更新) (较低版本git可能不能自动更新.git/config文件,需要手动修改)
未归类
- 《git fetch & pull详解》https://www.cnblogs.com/runnerjack/p/9342362.html
clone tag fetch pull push rebase cherry-pick squash
- 参考:
廖雪峰的官方网站